
Linux Security Lab - Complete Setup & Command Line Tutorial
Learn to set up a Linux security lab with VirtualBox using Ubuntu and master essential Linux commands through hands-on practice
1. Introduction#
Welcome to your journey into Linux system administration and security!
1.1 What is Linux?#
Linux is a free, open-source operating system kernel that powers:
- 100% of the world’s supercomputers
- 96.3% of the world’s top 1 million servers
- Android (the world’s most popular mobile OS)
- Most cloud infrastructure (AWS, Google Cloud, Azure)
Linux is built on Unix philosophy: simple tools that do one thing well, working together through text-based commands.
1.2 Linux Distributions (Distros)#
Since Linux is just a kernel, it’s packaged with various software into complete operating systems called distributions:
| Distribution | Use Case |
|---|---|
| Ubuntu | Beginners, servers, desktops |
| Debian | Stable servers |
| Fedora | Cutting-edge features |
| Arch Linux | Customization experts |
| Kali Linux | Security testing |
1.3 Why We Use Ubuntu for This Tutorial#
For this security lab, we’ll use Ubuntu 24.04.4 LTS because:
- ✅ Beginner-friendly - Easy to install and use
- ✅ Long-term support - LTS versions are supported for 5+ years
- ✅ Security tools - Easy access to pentesting and monitoring tools
- ✅ Large community - Extensive documentation and help available
- ✅ Industry standard - Widely used in cloud and enterprise
What You’ll Learn:
- Setting up a safe, isolated Linux lab environment
- Essential command-line operations (works on ALL Linux distros)
- File permissions and user management
- SSH for remote access
- Package management (APT - adaptable to other package managers)
Note: The Linux commands you learn in this tutorial work on ALL Linux distributions - Ubuntu, Debian, Kali, Fedora, Arch, and more!
2. VirtualBox Installation#
2.1 Download VirtualBox#
Visit https://www.virtualbox.org/wiki/Downloads ↗ and download the “Platform Package” for your Host OS:
- Windows: VirtualBox x.x.x Windows hosts
- macOS: VirtualBox x.x.x macOS hosts (Intel or Apple Silicon)
2.2 Installation#
- Windows: Run the installer and follow the prompts
- macOS: Open the DMG file and drag VirtualBox to Applications
3. Setting Up Your Lab Environment#
3.1 Download Ubuntu 24.04.4 LTS#
Choose one of the following sources:
Official Ubuntu: https://releases.ubuntu.com/24.04.4/ubuntu-24.04.4-desktop-amd64.iso ↗
Google Drive Mirror: https://drive.google.com/drive/folders/1pINC05tup1lBqLuzIuzJ7hVSHyPi-G_O?usp=sharing ↗
Note: LTS (Long Term Support) versions are supported for 5+ years, making them ideal for security labs.
3.2 Create Your Virtual Machine#
Step 1: Start the New VM Wizard
- Open VirtualBox
- Click the New button (Blue Star icon)
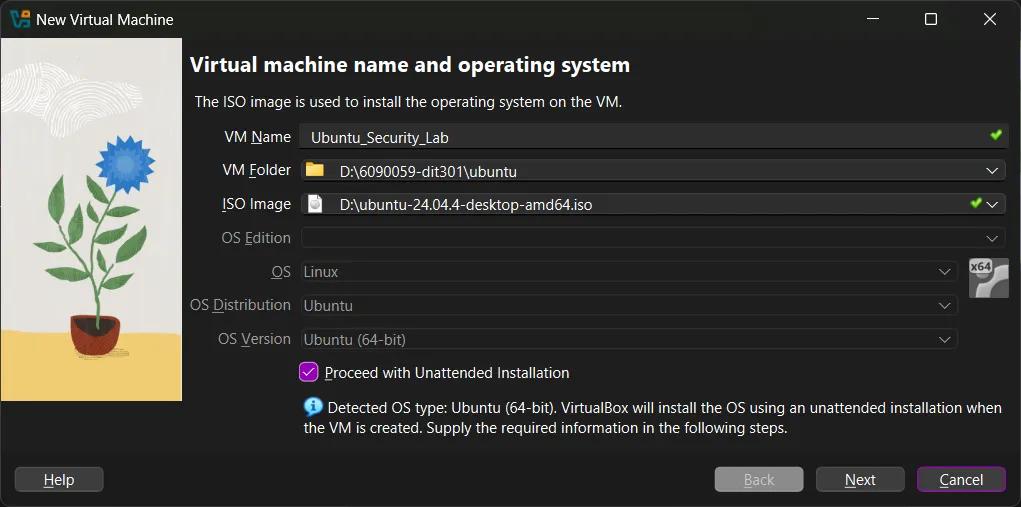
Step 2: Name and Operating System
Fill in the following information:
| Setting | Value |
|---|---|
| Name | Linux_Security_Lab |
| VM Folder | Choose your preferred location (e.g., D:\6090059-dit301\ubuntu) |
| ISO Image | ubuntu-24.04.4-desktop-amd64.iso |
| Unattended Installation | ✓ Check this box |
Step 3: Unattended Installation Setup
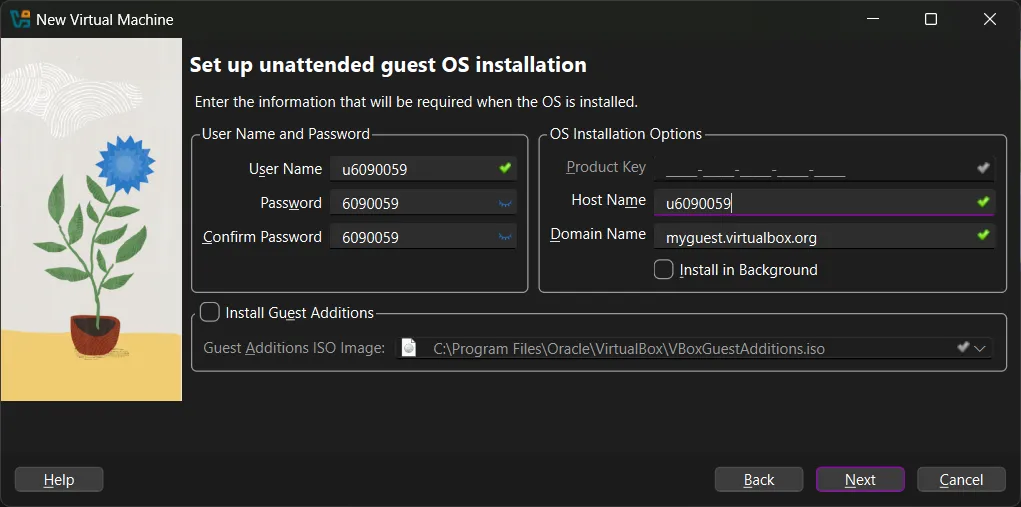
Configure the user account:
| Setting | Value |
|---|---|
| Username | Your preferred username (e.g., u6090059) |
| Password | Choose a strong password |
| Hostname | u6090059 |
Step 4: Define Hardware Resources
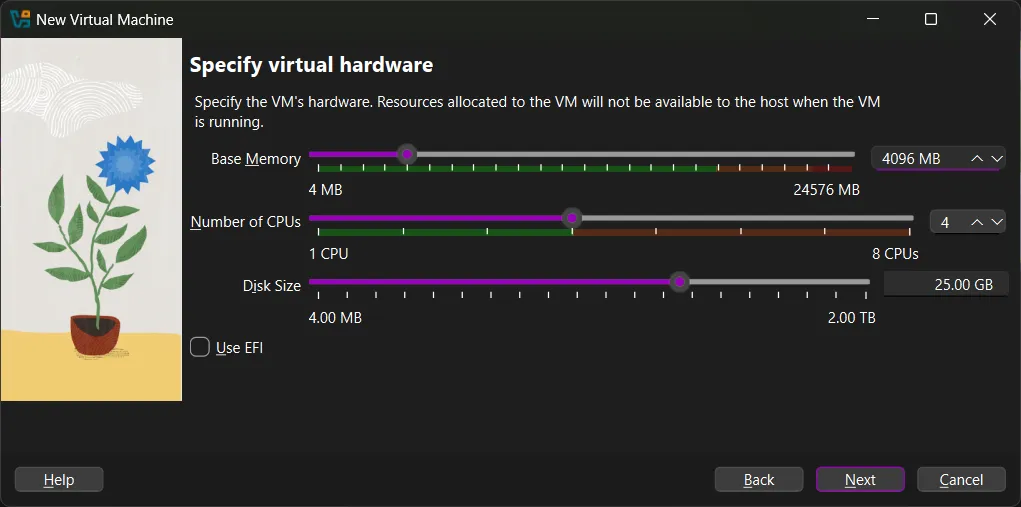
Base Memory (RAM):
- Recommended: 4096 MB (4 GB)
- Warning: Stay in the green zone! If you give the VM too much RAM, your host computer may crash.
Number of CPUs:
- Recommended: 4 cores (or half of your available CPUs)
Disk Size:
- Minimum: 25 GB
- Linux is small, but you need extra room for security tools and logs.
Step 5: Finalize and Start
- Review your VM settings
- Click Finish to create the VM
- Click the Green Arrow or double-click the VM to power on
3.3 Ubuntu Installation#
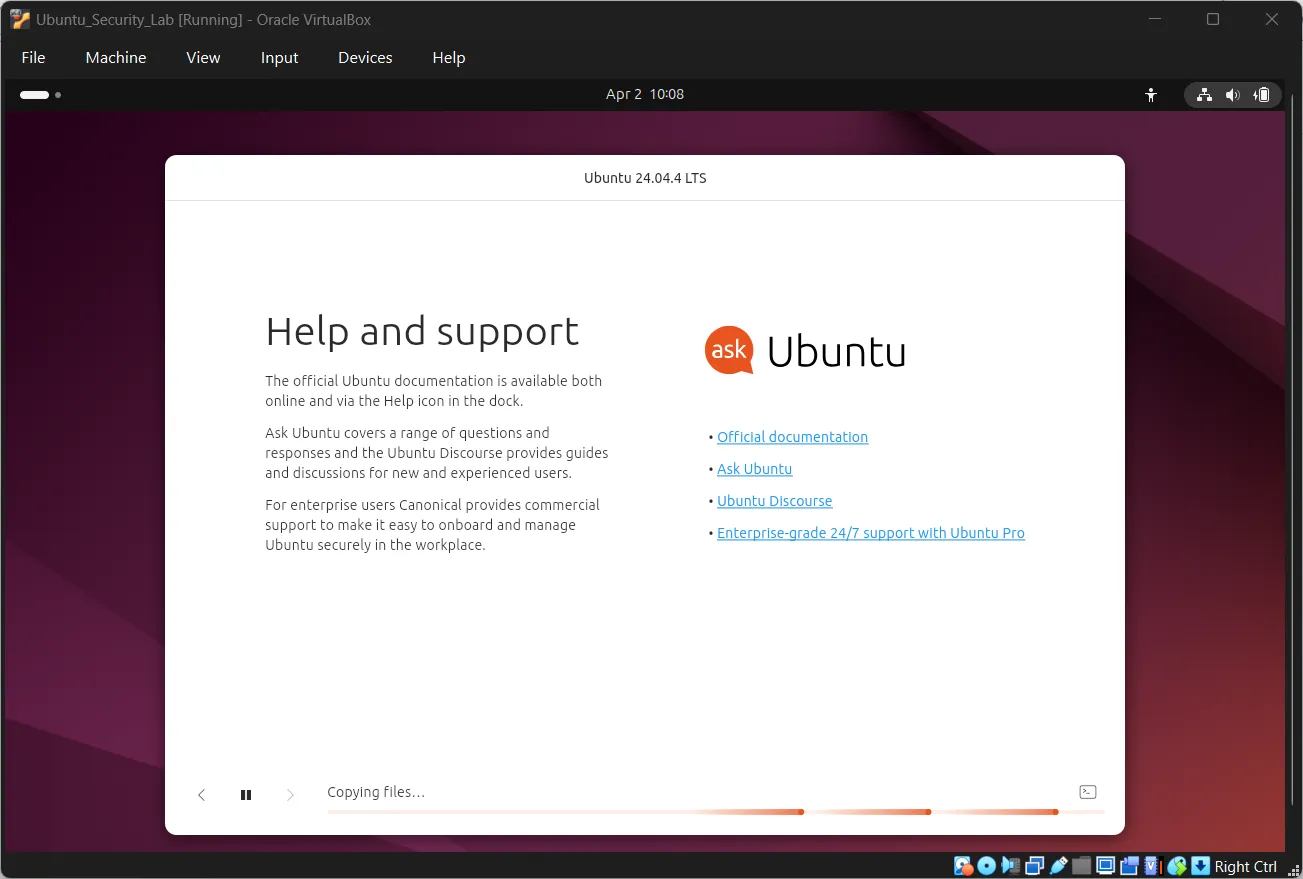
- Language Selection: Choose your language and click “Install Ubuntu”
- Installation Type: Select “Erase disk and install Ubuntu”
- Location: Detect your location or type it manually
- User Account: Your unattended installation settings will be applied
- Installation Progress: Wait for installation to complete
- Restart: Click “Restart Now” when prompted
4. Navigation 101 - Your First Commands#
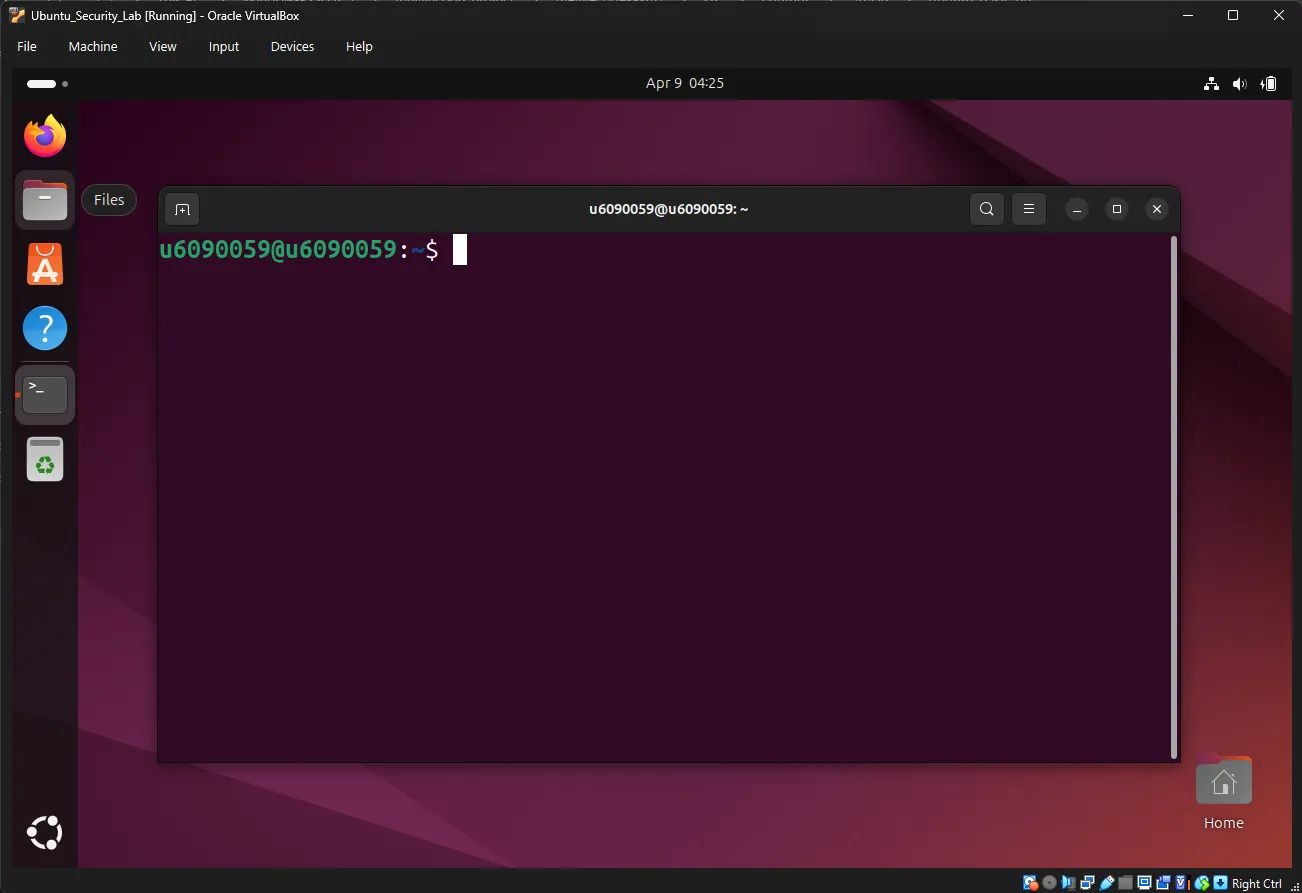
Now that Ubuntu is installed, open your terminal by pressing Ctrl + Alt + T or searching for “Terminal” in the Applications menu.
Your Prompt: You should see something like
u6090059@u6090059:~$
u6090059is your usernameu6090059is the hostname~means you’re in your home directory$means you’re a regular user
4.1 Exercise 1: Where Am I?#
Command: pwd (Print Working Directory)
pwdExpected Output:
/home/u6090059Explanation: This shows your current location in the filesystem. You’re in your home directory.
4.2 Exercise 2: What’s Here?#
Command: ls (List)
lsExpected Output (may vary):
Desktop Documents Downloads Music Pictures Public Templates VideosExplanation: This shows visible files and folders in your current directory.
Try the variations:
ls -lExpected Output:
total 32
drwxr-xr-x 2 u6090059 u6090059 4096 Apr 9 10:30 Desktop
drwxr-xr-x 2 u6090059 u6090059 4096 Apr 9 10:30 Documents
drwxr-xr-x 2 u6090059 u6090059 4096 Apr 9 10:30 Downloads
...Explanation: The -l flag shows:
d= directory- Permissions (
rwxr-xr-x) - Owner and group
- Size
- Last modified date/time
ls -aExpected Output:
. .. .bashrc .config .local .ssh Desktop Documents DownloadsExplanation: The -a flag shows hidden files (starting with .).
4.3 Exercise 3: Moving Around#
Command: cd (Change Directory)
cd Documents
pwdExpected Output:
/home/u6090059/DocumentsNow try:
cd ..
pwdExpected Output:
/home/u6090059Explanation: .. means “parent directory” (go up one level).
Return home quickly:
cd ~
pwdExpected Output:
/home/u6090059Explanation: ~ is a shortcut for your home directory.
5. File and Directory Operations#
5.1 Exercise 4: Creating Directories#
Command: mkdir (Make Directory)
cd ~
mkdir security_lab
ls -lExpected Output:
...
drwxr-xr-x 2 u6090059 u6090059 4096 Apr 9 14:30 security_lab
...Create nested directories:
mkdir -p security_lab/tools security_lab/logs security_lab/scripts
ls -l security_lab/Expected Output:
total 12
drwxr-xr-x 2 u6090059 u6090059 4096 Apr 9 14:31 logs
drwxr-xr-x 2 u6090059 u6090059 4096 Apr 9 14:31 scripts
drwxr-xr-x 2 u6090059 u6090059 4096 Apr 9 14:31 toolsExplanation: The -p flag creates parent directories as needed.
5.2 Exercise 5: Creating Files#
Command: touch (Create empty file or update timestamp)
cd security_lab
touch notes.txt
touch tools/scanner.sh
ls -l
ls -l tools/Expected Output:
-rw-r--r-- 1 u6090059 u6090059 0 Apr 9 14:32 notes.txt

tools/:
total 0
-rw-r--r-- 1 u6090059 u6090059 0 Apr 9 14:32 scanner.sh5.3 Exercise 6: Viewing File Contents#
Command: cat (Concatenate and display)
echo "This is my security lab notes" > notes.txt
cat notes.txtExpected Output:
This is my security lab notesExplanation: The > redirects output to a file.
Try other viewing commands:
echo "Line 1" >> notes.txt
echo "Line 2" >> notes.txt
cat notes.txtExpected Output:
This is my security lab notes
Line 1
Line 2Explanation: The >> appends to the file instead of overwriting.
5.4 Exercise 7: Using the Nano Text Editor#
Nano is a beginner-friendly text editor that runs directly in the terminal. Unlike graphical editors, nano works entirely with keyboard shortcuts and is available on virtually all Linux systems.
Why learn nano?
- ✅ Available on all Linux distributions by default
- ✅ Simple and intuitive - no modes like vim
- ✅ Perfect for editing config files and scripts
- ✅ Works over SSH connections
Opening Nano
Create or open a file:
nano practice.txtExpected Output: A new window appears with nano’s interface.
Understanding Nano’s Interface
  GNU nano 7.2                      practice.txt

[ New File ]

^G Help      ^O Write Out  ^W Where Is   ^K Cut       ^T Execute
^X Exit ^R Read File ^\ Replace ^U Paste ^J JustifyThe top bar shows:
- The nano version
- The filename you’re editing
The bottom bar shows keyboard shortcuts:
^means theCtrlkey^GmeansCtrl + G(Get Help)^OmeansCtrl + O(Write Out/Save)
Common Nano Commands
| Shortcut | Action | Description |
|---|---|---|
^X | Exit | Close nano (prompts to save if changed) |
^O | Write Out | Save the file |
^G | Get Help | Show help screen |
^W | Where Is | Search for text |
^K | Cut Text | Cut the current line |
^U | UnCut Text | Paste (uncut) at cursor |
^C | Cur Pos | Show cursor position |
^Y | Prev Page | Page up |
^V | Next Page | Page down |
Practice Exercise
Step 1: Create and edit a file
nano security_lab/todo.txtStep 2: Type some content
Press these keys to type:
Learn SSH commands
Practice file permissions
Set up firewall rulesStep 3: Save the file
Press Ctrl + O (Write Out)
You’ll see:
File Name to Write: todo.txtPress Enter to confirm.
Step 4: Exit nano
Press Ctrl + X
Step 5: Verify your file
cat security_lab/todo.txtExpected Output:
Learn SSH commands
Practice file permissions
Set up firewall rulesEditing an Existing File
Open a file you created earlier:
nano security_lab/todo.txtNavigate and edit:
- Use Arrow keys to move around
- Type to add text
- Use
Backspaceto delete characters - Use
Ctrl + Kto cut entire lines - Use
Ctrl + Uto paste lines
Add a new task at the bottom:
Master the nano editorSave and exit: Ctrl + O, then Ctrl + X
Search in Nano
Open a file and search:
nano security_lab/todo.txtPress Ctrl + W (Where Is)
Type: SSH and press Enter
Nano will jump to the first occurrence of “SSH”.
Find next occurrence: Press Ctrl + W again, then Enter
Pro Tips
- Always remember:
Ctrl + Xto exit,Ctrl + Oto save - Show line numbers: Start with
nano -l filenameto enable line numbers - Don’t panic: If something goes wrong, nano will prompt you before discarding changes
- Get help anytime: Press
Ctrl + Ginside nano for full documentation
5.5 Exercise 8: Copying and Moving#
Copy a file:
cp notes.txt notes_backup.txt
ls -lMove (rename) a file:
mv notes_backup.txt old_notes.txt
ls -l5.6 Exercise 9: Deleting Files#
Warning: Deleted files cannot be easily recovered!
Delete a single file:
touch test_file.txt
rm test_file.txt
ls test_file.txtExpected Output:
ls: cannot access 'test_file.txt': No such file or directoryDelete a directory and contents:
mkdir temp_folder
touch temp_folder/file1.txt
rm -r temp_folderExplanation: The -r flag means “recursive” (delete everything inside).
6. Permissions and Sudo#
6.1 Understanding Users#
Linux User Hierarchy:
| User Type | UID | Capabilities |
|---|---|---|
| Root | 0 | Complete control over the system |
| System Users | 1-999 | Run services (e.g., www-data, sshd) |
| Regular Users | 1000+ | Limited privileges (your user account) |
Check your user:
whoami
idExpected Output:
u6090059
uid=1000(u6090059) gid=1000(u6090059) groups=1000(u6090059),27(sudo)6.2 Exercise 10: Using Sudo#
Command: sudo (SuperUser DO)
Try a command that requires root:
cat /etc/shadowExpected Output:
cat: /etc/shadow: Permission deniedNow with sudo:
sudo cat /etc/shadowExpected Output:
[sudo] password for u6090059:
root:$6$hash...:18989:0:99999:7:::
daemon:*:18989:0:99999:7:::
...Explanation:
- You’re asked for your password (not root’s password)
- The password doesn’t appear as you type (security feature)
- Linux remembers your authorization for a few minutes
6.3 Understanding Prompts#
| Prompt | Meaning | Danger Level |
|---|---|---|
$ | Regular user | Safe |
# | Root user | ⚠️ Be Careful! |
Switch to root (not recommended for beginners):
sudo -i
whoami
exitExpected Output:
root
# (notice the # prompt)Explanation: exit returns you to your regular user.
7. Package Management with APT#
APT (Advanced Package Tool) is Ubuntu’s package manager - like an “App Store” for the command line.
7.1 Exercise 11: Update Package Lists#
Command: sudo apt update
sudo apt updateExpected Output:
Hit:1 http://archive.ubuntu.com/ubuntu noble InRelease
Get:2 http://archive.ubuntu.com/ubuntu noble-security InRelease
...
Reading package lists... Done
Building dependency tree... DoneExplanation: This downloads the latest package information from Ubuntu’s repositories. It doesn’t install anything yet - just updates the “catalog.”
7.2 Exercise 12: Upgrade System#
Command: sudo apt upgrade
sudo apt upgradeExpected Output:
Reading package lists... Done
Building dependency tree... Done
Calculating upgrade... Done
The following packages will be upgraded:
  curl git wget...
Do you want to continue? [Y/n] yExplanation: This installs available updates for installed packages.
7.3 Exercise 13: Install a Package#
Command: sudo apt install [package-name]
sudo apt install treeExpected Output:
Reading package lists... Done
Building dependency tree... Done
The following NEW packages will be installed:
  tree
...
Do you want to continue? [Y/n] yTest the new command:
cd ~
tree -L 1 security_labExpected Output:
security_lab/
├── logs
├── notes.txt
├── old_notes.txt
├── scripts
└── tools7.4 Exercise 14: Remove a Package#
Command: sudo apt remove [package-name]
sudo apt remove treeRemove configuration files too:
sudo apt purge treeClean up unused dependencies:
sudo apt autoremove8. SSH Setup and Configuration#
SSH (Secure Shell) allows you to remotely control your Ubuntu VM from your host machine.
8.1 What is SSH?#
| Feature | Telnet (Old) | SSH (Modern) |
|---|---|---|
| Encryption | ❌ No (plaintext) | ✅ Yes |
| Password Protection | ❌ Visible | ✅ Hidden |
| Port | 23 | 22 |
The Client-Server Model:
- SSH Server: Runs on the machine you want to control (Ubuntu VM)
- SSH Client: Runs on the machine you’re sitting at (Windows/Mac Host)
8.2 Exercise 15: Install SSH Server#
Ubuntu Desktop doesn’t include the SSH server by default.
sudo apt update
sudo apt install openssh-serverExpected Output:
The following NEW packages will be installed:
  openssh-server
...
Do you want to continue? [Y/n] y8.3 Exercise 16: Verify SSH Service#
Check if SSH is running:
sudo service ssh statusExpected Output (SSH not running):
● ssh.service - OpenBSD Secure Shell server
     Loaded: loaded (/usr/lib/systemd/system/ssh.service; disabled; preset: disabled)
Active: inactive (dead)Key things to look for:
Active: inactive (dead)- SSH is not runningdisabled- SSH is not set to start on boot
Start SSH service:
sudo service ssh startVerify SSH is now running:
sudo service ssh statusExpected Output (SSH running):
● ssh.service - OpenBSD Secure Shell server
     Loaded: loaded (/usr/lib/systemd/system/ssh.service; disabled; preset: disabled)
Active: active (running) since Wed 2026-04-09 15:00:00 UTC; 5s agoStart SSH automatically on every boot:
sudo systemctl enable sshExplanation: service ssh start only runs SSH until the next reboot. systemctl enable ssh makes it start on boot, so you don’t get “Connection refused” after restarting the VM.
8.4 Exercise 17: Configure Firewall#
Ubuntu’s firewall (ufw) is OFF by default.
Check firewall status:
sudo ufw statusExpected Output:
Status: inactiveStep A: Allow SSH:
sudo ufw allow sshExpected Output:
Rules updated
Rules updated (v6)Step B: Enable Firewall:
sudo ufw enableExpected Output:
Firewall is active and enabled at system startupStep C: Verify Configuration:
sudo ufw status verboseExpected Output:
Status: active

To                         Action      From
--                         ------      ----
22/tcp                     ALLOW       Anywhere
22/tcp (v6) ALLOW Anywhere (v6)Explanation: Port 22 (SSH) is now allowed through the firewall.
9. Networking - Port Forwarding Setup#
9.1 How Port Forwarding Works#
VirtualBox’s NAT + Port Forwarding allows you to connect from your host to the VM by forwarding a port on your host to the VM’s SSH port.
Host (Windows/macOS)    VirtualBox NAT          VM (Ubuntu)
localhost:2222 ───────────────────────► port 22 (SSH)Why this method?
- ✅ Works on all networks (WiFi, Ethernet, offline)
- ✅ No network configuration needed
- ✅ Most reliable connection method
- ✅ Default VirtualBox setup (NAT is already configured)
9.2 Exercise 18: Configure Port Forwarding#
Step 1: Shut down the VM
sudo poweroffStep 2: Open VirtualBox Network Settings
- In VirtualBox, select your Linux_Security_Lab VM
- Click Settings → Network
- Ensure Adapter 1 is enabled and Attached to: is set to “NAT”
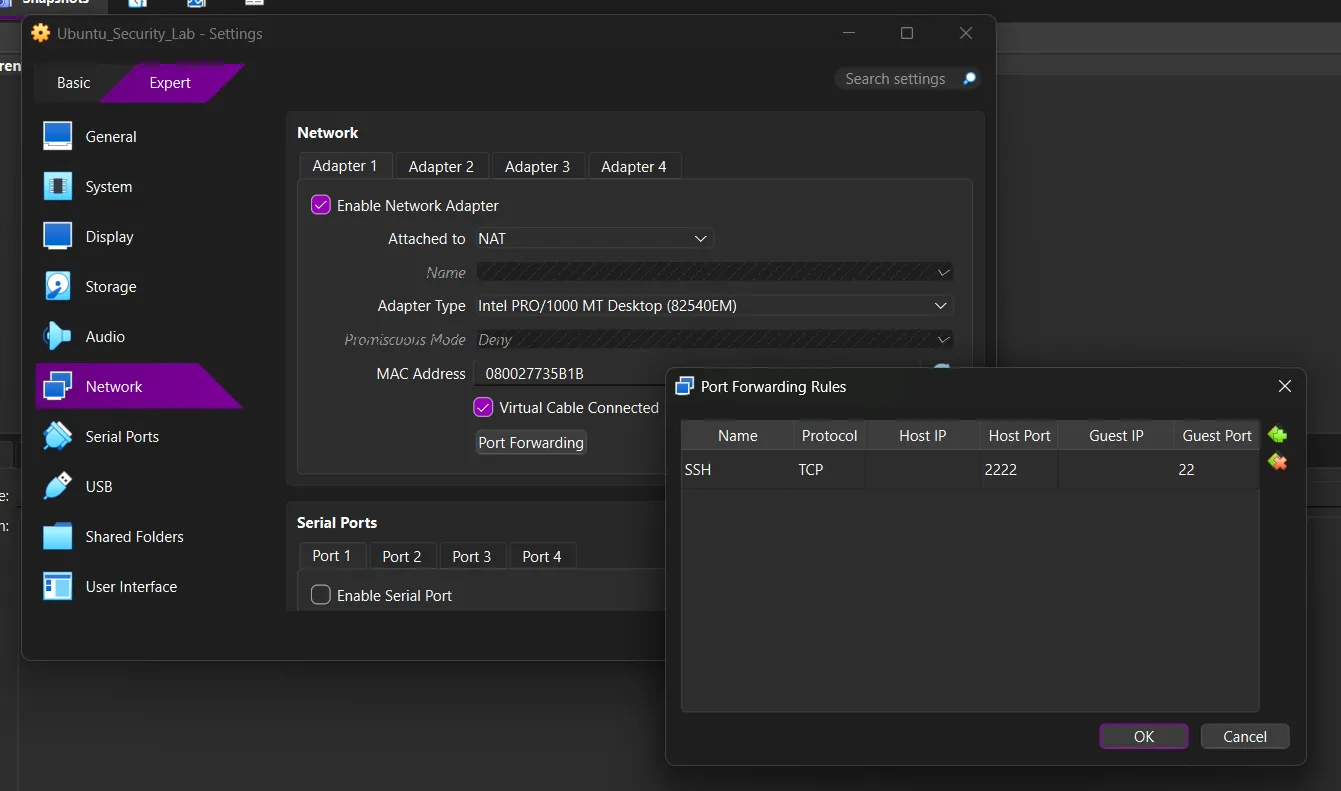
Step 3: Add Port Forwarding Rule
- Click the Port Forwarding button
- Click the + icon (green plus) to add a new rule
Configure the rule:
| Setting | Value |
|---|---|
| Name | SSH |
| Protocol | TCP |
| Host IP | (leave empty) |
| Host Port | 2222 |
| Guest IP | (leave empty) |
| Guest Port | 22 |
Step 4: Save and Start VM
- Click OK to close the Port Forwarding window
- Click OK to close the Settings window
- Click the Green Arrow to start your VM
9.3 Understanding the Ports#
| Component | Port | Description |
|---|---|---|
| Host Port | 2222 | The port on YOUR computer you connect to |
| Guest Port | 22 | The SSH port inside the Ubuntu VM |
| Protocol | TCP | SSH uses TCP protocol |
Why port 2222? Port 22 may be used by other services on your host. Using 2222 avoids conflicts. You can use any port from 1024-65535.
10. Connecting from Host Machine#
10.1 Exercise 19: SSH from Windows#
Open Command Prompt or PowerShell on Windows:
ssh -p 2222 u6090059@localhostReplace: u6090059 with your Ubuntu username.
First Connection - Fingerprint Warning:
The authenticity of host '[localhost]:2222 ([127.0.0.1]:2222)' can't be established.
ED25519 key fingerprint is SHA256:abc123...
This key is not known by any other names.
Are you sure you want to continue connecting (yes/no/[fingerprint])?Type: yes and press Enter
Enter your Ubuntu password (it won’t show as you type):
u6090059@localhost's password:Expected Output:
Welcome to Ubuntu 24.04.4 LTS...
u6090059@u6090059:~$Success! You’re now controlling your VM from your Windows host.
10.2 Exercise 20: SSH from macOS#
Open Terminal on macOS:
ssh -p 2222 u6090059@localhostFollow the same steps as Windows (accept fingerprint, enter password).
10.3 Exercise 21: Exit SSH Session#
Type: exit or press Ctrl + D
u6090059@u6090059:~$ exit
logout
Connection to localhost closed.11. Quick Reference Card#
11.1 Navigation#
| Command | Description |
|---|---|
pwd | Print working directory (where am I?) |
ls | List files and folders |
ls -l | List with details |
ls -a | List including hidden files |
cd [dir] | Change to directory |
cd .. | Go up one level |
cd ~ | Go to home directory |
11.2 File Operations#
| Command | Description |
|---|---|
mkdir [name] | Create directory |
touch [file] | Create empty file |
cp [src] [dest] | Copy file/directory |
mv [src] [dest] | Move/rename file/directory |
rm [file] | Delete file |
rm -r [dir] | Delete directory |
cat [file] | Display file contents |
11.3 Permissions & Sudo#
| Command | Description |
|---|---|
sudo [cmd] | Execute as root |
sudo -i | Switch to root shell |
whoami | Show current user |
id | Show user ID and groups |
chmod [perms] [file] | Change permissions |
chown [user] [file] | Change owner |
11.4 Package Management#
| Command | Description |
|---|---|
sudo apt update | Update package lists |
sudo apt upgrade | Upgrade installed packages |
sudo apt install [pkg] | Install package |
sudo apt remove [pkg] | Remove package |
sudo apt purge [pkg] | Remove + config files |
sudo apt autoremove | Remove unused packages |
11.5 SSH & Networking#
| Command | Description |
|---|---|
ip a | Show IP addresses |
ifconfig | Show network config (classic) |
ssh -p 2222 [user]@localhost | Connect to VM via Port Forwarding |
exit | Exit SSH session |
sudo ufw allow ssh | Allow SSH in firewall |
sudo ufw enable | Enable firewall |
sudo ufw status | Check firewall status |
11.6 VirtualBox Port Forwarding#
| Setting | Value |
|---|---|
| Name | SSH |
| Protocol | TCP |
| Host Port | 2222 |
| Guest Port | 22 |
| Host IP | (leave empty) |
| Guest IP | (leave empty) |
12. Next Steps#
Congratulations! You’ve completed the Linux Security Lab setup tutorial. You now have:
- ✅ A working Linux virtual machine (Ubuntu)
- ✅ Essential command-line skills (universal to all Linux distros)
- ✅ Understanding of permissions and sudo
- ✅ SSH access from your host machine
- ✅ Package management with APT
12.1 Recommended Learning Path#
- Learn Vim - The other terminal editor you’ll meet on any server
- Bash Scripting - Automate tasks with scripts
- Process Management -
ps,top,kill - Log Management -
/var/log/directory - Security Tools -
nmap,wireshark,metasploit
12.2 Practice Commands#
Try these exercises to reinforce your learning:
# Create a project structure
mkdir -p ~/projects/my_app/{src,docs,tests}

# Create a script
cat > ~/projects/my_app/run.sh << 'EOF'
#!/bin/bash
echo "Running my application"
EOF

# Make it executable
chmod +x ~/projects/my_app/run.sh

# Run it
~/projects/my_app/run.sh

# Check system info
uname -a
df -h
free -h12.3 Resources#
- Ubuntu Documentation ↗
- Linux Journey ↗ - Interactive Linux tutorial
- SSH Manual ↗ -
man sshin terminal - Command Line Magic ↗